This is fourth and final installment of my chronicle to document the restoration of a free Snark sailboat. In the previous three installments, I documented the original hull damage and subsequent repair, making of new parts to replace those missing and painting the hull to give it a fresh new appearance.
To get to this point took over a month in the restoration effort. Now we are at the of the effort where we put everything together. So settle back, grab your favorite beverage and watch the new Snark come to life over the next topics.
First, lets start fitting some of our new parts to the hull. We start with the daggerboard.
Daggerboard and Rub Rail
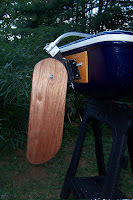
As mentioned previously, I was seeking a tight fit of the daggerboard in the trunk. So when I assembled the new daggerboard I deliberately made the side pieces that hold it in place in the top of the trunk oversize so I could sand them down to a precise fit. Once I had gotten the necessary fit, I varnished the modified edges and added the finishing touch to the daggerboard: a rope handle through the top.
For accessory rope like this I used cheap polypropylene line from Home Depot. I picked up 100 feet for $7, more than enough to do what I want. We will use it in several places on the new Snark.
I cut a small two foot length of line, ran it through each hole and tied it off with a stopper knot on the end to keep it in place. Here is how the daggerboard looks fitted into the trunk from the top show the tight fit and rope handle:


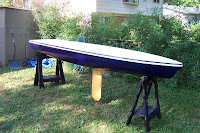
With our daggerboard fitted into place, I grab the rub rail I had pulled off and cleaned earlier and worked it back into the hull. Now we're getting a hint of what our new sailboat will look like:

Transom Assembly
With the rub rail and daggerboard in place for balance, let's move on with the transom assembly.
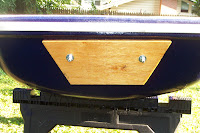
During the wood part crafting, I drilled a set of holes into each new piece using the original piece as a guide. That way the hole spacing would be correct without having to measure. The holes are 5/16 of an inch in diameter matching the holes in the hull that go through the transom. For the bolts, I used 4 inch 5/16 plated steel bolts with matching nuts and washers. You simply thread the bolts through and snug the nuts down. Take care though. Don't tighten them too snug or you'll crush the foam. Just beyond hand tight is good.
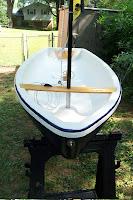
Here's the boat with it's new transom attached:


We'll return to the transom when we attach the gudgeon and hang the rudder/tiller assembly. For now, we move on to the last piece of new wood: the mast deck.
Mast Deck Assembly
With the transom attached, we move forward to the last piece of wood to attach: the mast deck.
The mast deck was prepped and dryfitted previously. The critical part with the mast deck, the mast step, was cleaned up the same way the spars were but left unpainted. It fits the centerhole perfectly. Now it is time to drill the remaining holes that hold the deck to the hull.
When detaching the original mast deck, I noticed that the screws that held it in place let go suddenly. A little probing showed there are threaded sleeves/collars inside the hull that accept the screws and allow them to be tightened down. So when I removed the screws I took them to the local hardware store to match them up.
#10 sheet metal screws are the closest match to the originals in terms of head style (panhead) and thread pitch. I bought the closest size they had at 3 1/2 inches long. Unfortunately, these were a shade shorter than the originals and with the thickness of the wood, would only get a couple of turns for snugness. This was not enough.
The only #10 screws longer than 3 1/2 inches that were readily available were wood screws. These were countersunk instead of panhead. When I test threaded them into the hull, they grabbed without resistance and didn't show much play. This would require me to deviate from the original deck mounting since countersunk screws won't allow me to use washers for reinforcement.
I considered this acceptable and drilled my mounting holes at the positions I measured previously with a drill bit slightly smaller than the #10 screw. With those drilled, I used the tip of a 5/16 inch drill bit to create the countersink hole. With that done I threaded the wood screws into their holes and with a set of quick passes with my drill and a screwdriver bit, drove each home snugly. The mast step slid smoothly into place.
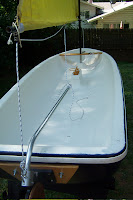
It turned out quite nicely...


My boat is becoming a Snark again with all of her new wood in place:

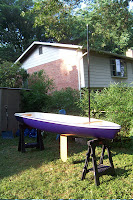
I raise the mast to check fit and see where we're headed...

With all of the wood in place and a waiting mast, it's time to hang the new hardware and rig the Snark.
Gudgeon and Rudder Assembly
I decided not to make a new rudder assembly for the boat based on the original part I had available. Newer Snarks have a much updated rudder assembly with a longer, lighter tiller and a kick-up rudder blade. Since I rated the effort in making a new rudder and obtaining compatible hardware equal in cost to buying a new one, I simply bought a new one. Now we finally mount it.
The rudder assembly consists of two parts: the gudgeon and the rudder/tiller assembly. The gudgeon is the part that is attached to the transom that we hang the rudder from. On the Snark, this is a plastic part attached with four big self-tapping screws.
Like the mast, it needs to be properly positioned on the boat's centerline. To do this, I measure dthe exact center of the transom at the top and hung a weighted line from that point. Bringing the hull level, the line passes through the exact center of the bottom of the boat. With the vertical centerline established I marked it on the transom. Using the marked line, I use the dimensions of the gudgeon to center it evenly between the top and bottom of the outer transom and its shaft in line with the drawn centerline.
Carefully, I used a drill bit the same size as the gudgeon holes and drilled four pilot holes, just deep enough to allow the screws to get started. With them drilled, I switched to a driver bit and drove all four screws home.
The gudgeon is properly centered. Phew!
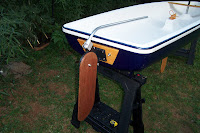
With that out of the way, the rest is child's play and I hand the assembled rudder and tiller in place. One shiny, brand-new rudder coming up!

Rigging
With all of the major subassemblies of the boat attached, the only work remaining is to rerig the spars and mate them to the mast. It is at this point that our Snark "jumps the shark".
The Snark uses nylon eye straps and attached O-rings as line guides on the boom for the mainsheet (the line that controls the main sail from side-to-side). These are basic, no-frills and cheap fittings. Since I have gone to a lot of work to add a touch of class to my Snark, I decided to step things up a bit.
I replaced the nylon eye straps with Harken 1 1/16 inch stainless parts intended as small fairleads. I used new 1/2 inch metal screws to mount them. A total of four are needed: two on the end of each spar, one forward for the mainsheet on the boom and one center on the gaff for the main halyard. I also replaced the pivot bolt for the boom/gaff with a new 1/4 inch stainless machine screw, three fender washers (two in-between, one on the threaded end), a lock washer and nylon lock nut.
To replace the O-rings that guided the mainsheet, I used Ronstan Series 30 Orbit swivel blocks attached to the eye straps. These small blocks fit neatly with their own shackles and two are used on the boom.
Yup, you read that right...a Snark with Harken and Ronstan hardware on it.
We're not done. The original mast deck used a small cleat for the main halyard. The original cleat is perfectly functional but here I am drawing inspiration from my own large sailboat boat and stuff I've read about Snarks. In a capsize I want to ensure the mast stays attached to the boat even if the halyard is undone. A conventional cleat doesn't allow this. I want something different.
My Catalina 27 is rigged for singlehanding. That means all of my lines, both halyards and sheets, are run to the cockpit. With the exception of the boom vang, which requires me to lean into the companionway to access, I can raise or lower the sails from the safety of the cockpit. To achieve this, my halyards descend the mast and go through turning blocks that redirect them along the deck and back to the cockpit and dedicated winches.
I like this setup. So I will repeat it here. Minus the winches, of course.
I use another Harken eyestrap and bolt it through the mast deck. With that in place I mount a third Ronstan swivel block to serve as a 90 degree turning block. This redirects the halyard parallel to the mast deck. To cleat it off when the sail is up or down, I use a Ronstan V-cleat with fairlead instead of a conventional cleat. This allows me to put a stopper knot in the halyard and that prevents the halyard from going through the cleat and stops the mast from parting from the boat.
Lastly, I attach the original Snark capacity plate/sticker from the original mast deck to the new one. This goes on with 3M spray adhesive. It went kind of bubbly but you don't notice from a distance.
Here's the new mast deck rigging:


For the lines, I bought new 3/16" Sta-Set polyester line. Each is 20 feet in length, one for the main halyard and one for the mainsheet. For the working ends, I tied in a small bowline. Through this I ran a 3/16" stainless anchor shackle. The main halyard with shackle attaches to the eye strap on the gaff to allow me to raise and lower the sail. The mainsheet shackle is attached to the top of the tiller, run through the bowline on the mainsheet and the line through the blocks on the boom. A stopper knot on the end of the mainsheet prevents it from being pulled back through the blocks.
Here's the mainsheet rigged and ready to go:

And the main halyard. Note the 3/16" shackle on the top of the gaff:


With these lines attached, we also complete the rigging of the Snark. Without further adieu, may I present Mini-Heeler in her fully restored glory:


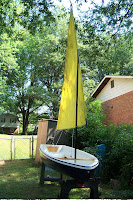
I think she turned out quite nicely. The original sail is still a little dirty but what do you expect from free?
Transport and First Sail
With the Snark assembled, there is the natural eagerness to take her out and see how she does on the water. For this, I began fitting the boat for sea and transport to and from. One thing I decided to rig was a means of dragging and carrying the boat. For this, I added an eye screw to the inside transom and loop a double length of polypropylene line to a snap shackle that attaches to the bow eye. On that I tied a large bowline as a drag loop. This allows me to lift the boat using this bridle line or grab the loop to drag the boat across soft surfaces. Works great on grass.
It was during this process I also began to thing of how I was going to arrange storage and equipment in the boat. Since she is an open dinghy, the potential for important things like safety equipment to float away or sink becomes a concern. One of my core ideas for this boat is "all the important stuff stays attached". This concept allows for some neat simple solutions.
One of these is illustrated below in the form of an attached bailer. The bailer is a $2 paint container from Home Depot with a 5/16 inch drilled in the handle. I run a line through it and tie off a stopper knot. On the other end we tie a bowline and attach another 3/16" stainless anchor shackle. To keep the bailer attached, we loop the shackle end around the mast step and close the shackle on the line. The line is long enough to reach the center of the hull and allow the bailer to be retrieved in the event of going overboard or capsize.
Here's the hull derigged for transport with the bridle line attached but with the bailer in place to demonstrate:
The mast step proves to be the central aspect of keeping stuff attached to the boat. In addition to the bailer, I carry a small boat distress kit, a dry sack for my wallet and phone and mesh bag for telescoping paddle, hand compass, water, towel, spare hardware and to store anything else I might need. All of this gets secured around the mast step so it will stay with the boat if she goes over.
With the boat broken down, she gets tied to the roof of my Jeep and off I go to my marina. Four ratchet straps hold the boat securely in place and the spars are bungeed to the roof rack and mast step up underneath. Once at my marina, I reverse the process and carry the new boat to the boat ramp for launching.
Alas, nature intervened. With winds blowing around 10 knots, this was perfect sailing weather despite the heat. However Mr. Murphy decided that the moment I had the boat in the water and was rowing away was the perfect time to have a thunderstorm pass through.
So I found myself holding onto a pier until I was told it would take an hour or so to pass through. So I rowed the Snark to my Catalina and found that it would indeed snuggle nicely against her bigger sister in my slip. I tied her off and climbed aboard my big boat to wait out the storm.
After it passed, I bailed out the boat with her new bailer and went back into the creek to find sunny skies and no wind. So I paddled around the center of the creek, feeling out a sandbar with the paddle and got just enough of a breeze to let me sail, if such a word can be applied, slowly back to the boat ramp.
Here she is after her first successful "sail":


She floats and she looks good doing it!
Final Thoughts
This has been a hugely rewarding project. While I prove the adage that there is no such thing as a free boat, my costs have been reasonable. I did notice some things after my first trip that need resolving. The most notable postscript is the nylon sail really is on its last legs. In the photos above, the lighter diagonal across the sail is actually threadbare nylon and it tore during the first trip out. I can patch it with sail repair tape but a new sail is really in order.
So I ordered a new dacron sail. Now she truly is a new boat. The rest is just some additional fitting and adjustment for the daggerboard in its trunk.
The Snark is not done. I am working on a splash deck forward to give me a little drier space underneath and provide some wave protection. I am also debating cutting some wood and adding a toe rail of sorts to the top of the gunwhales from the mast deck to the transom. This would serve two purposes: to provide some wear protection during transport and give me a place to mount additional sail hardware. I think some cleats added to such a rail would allow me to cleat off the mainsheet instead of having to hold it and likewise do the same for the tiller and let the boat self-steer under sail. I'm thinking some cam cleats would be perfect. Other additions might be a cross beam to allow me to rig a traveller and/or boom vang and a means to hold a raised daggerboard in place. Lots to think about.
It doesn't end here. More posts will come on my trials and experiences with the Snark. I hope you've enjoyed it and learned something. I would welcome any comments and suggestions on how to improve the boat.
Fair winds!
To get to this point took over a month in the restoration effort. Now we are at the of the effort where we put everything together. So settle back, grab your favorite beverage and watch the new Snark come to life over the next topics.
First, lets start fitting some of our new parts to the hull. We start with the daggerboard.
Daggerboard and Rub Rail
As mentioned previously, I was seeking a tight fit of the daggerboard in the trunk. So when I assembled the new daggerboard I deliberately made the side pieces that hold it in place in the top of the trunk oversize so I could sand them down to a precise fit. Once I had gotten the necessary fit, I varnished the modified edges and added the finishing touch to the daggerboard: a rope handle through the top.
For accessory rope like this I used cheap polypropylene line from Home Depot. I picked up 100 feet for $7, more than enough to do what I want. We will use it in several places on the new Snark.
I cut a small two foot length of line, ran it through each hole and tied it off with a stopper knot on the end to keep it in place. Here is how the daggerboard looks fitted into the trunk from the top show the tight fit and rope handle:


With our daggerboard fitted into place, I grab the rub rail I had pulled off and cleaned earlier and worked it back into the hull. Now we're getting a hint of what our new sailboat will look like:


Transom Assembly
With the rub rail and daggerboard in place for balance, let's move on with the transom assembly.
During the wood part crafting, I drilled a set of holes into each new piece using the original piece as a guide. That way the hole spacing would be correct without having to measure. The holes are 5/16 of an inch in diameter matching the holes in the hull that go through the transom. For the bolts, I used 4 inch 5/16 plated steel bolts with matching nuts and washers. You simply thread the bolts through and snug the nuts down. Take care though. Don't tighten them too snug or you'll crush the foam. Just beyond hand tight is good.
Here's the boat with it's new transom attached:
We'll return to the transom when we attach the gudgeon and hang the rudder/tiller assembly. For now, we move on to the last piece of new wood: the mast deck.
Mast Deck Assembly
With the transom attached, we move forward to the last piece of wood to attach: the mast deck.
The mast deck was prepped and dryfitted previously. The critical part with the mast deck, the mast step, was cleaned up the same way the spars were but left unpainted. It fits the centerhole perfectly. Now it is time to drill the remaining holes that hold the deck to the hull.
When detaching the original mast deck, I noticed that the screws that held it in place let go suddenly. A little probing showed there are threaded sleeves/collars inside the hull that accept the screws and allow them to be tightened down. So when I removed the screws I took them to the local hardware store to match them up.
#10 sheet metal screws are the closest match to the originals in terms of head style (panhead) and thread pitch. I bought the closest size they had at 3 1/2 inches long. Unfortunately, these were a shade shorter than the originals and with the thickness of the wood, would only get a couple of turns for snugness. This was not enough.
The only #10 screws longer than 3 1/2 inches that were readily available were wood screws. These were countersunk instead of panhead. When I test threaded them into the hull, they grabbed without resistance and didn't show much play. This would require me to deviate from the original deck mounting since countersunk screws won't allow me to use washers for reinforcement.
I considered this acceptable and drilled my mounting holes at the positions I measured previously with a drill bit slightly smaller than the #10 screw. With those drilled, I used the tip of a 5/16 inch drill bit to create the countersink hole. With that done I threaded the wood screws into their holes and with a set of quick passes with my drill and a screwdriver bit, drove each home snugly. The mast step slid smoothly into place.
It turned out quite nicely...


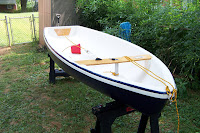
My boat is becoming a Snark again with all of her new wood in place:

I raise the mast to check fit and see where we're headed...


With all of the wood in place and a waiting mast, it's time to hang the new hardware and rig the Snark.
Gudgeon and Rudder Assembly
I decided not to make a new rudder assembly for the boat based on the original part I had available. Newer Snarks have a much updated rudder assembly with a longer, lighter tiller and a kick-up rudder blade. Since I rated the effort in making a new rudder and obtaining compatible hardware equal in cost to buying a new one, I simply bought a new one. Now we finally mount it.
The rudder assembly consists of two parts: the gudgeon and the rudder/tiller assembly. The gudgeon is the part that is attached to the transom that we hang the rudder from. On the Snark, this is a plastic part attached with four big self-tapping screws.
Like the mast, it needs to be properly positioned on the boat's centerline. To do this, I measure dthe exact center of the transom at the top and hung a weighted line from that point. Bringing the hull level, the line passes through the exact center of the bottom of the boat. With the vertical centerline established I marked it on the transom. Using the marked line, I use the dimensions of the gudgeon to center it evenly between the top and bottom of the outer transom and its shaft in line with the drawn centerline.
Carefully, I used a drill bit the same size as the gudgeon holes and drilled four pilot holes, just deep enough to allow the screws to get started. With them drilled, I switched to a driver bit and drove all four screws home.
The gudgeon is properly centered. Phew!
With that out of the way, the rest is child's play and I hand the assembled rudder and tiller in place. One shiny, brand-new rudder coming up!


Rigging
With all of the major subassemblies of the boat attached, the only work remaining is to rerig the spars and mate them to the mast. It is at this point that our Snark "jumps the shark".
The Snark uses nylon eye straps and attached O-rings as line guides on the boom for the mainsheet (the line that controls the main sail from side-to-side). These are basic, no-frills and cheap fittings. Since I have gone to a lot of work to add a touch of class to my Snark, I decided to step things up a bit.
I replaced the nylon eye straps with Harken 1 1/16 inch stainless parts intended as small fairleads. I used new 1/2 inch metal screws to mount them. A total of four are needed: two on the end of each spar, one forward for the mainsheet on the boom and one center on the gaff for the main halyard. I also replaced the pivot bolt for the boom/gaff with a new 1/4 inch stainless machine screw, three fender washers (two in-between, one on the threaded end), a lock washer and nylon lock nut.
To replace the O-rings that guided the mainsheet, I used Ronstan Series 30 Orbit swivel blocks attached to the eye straps. These small blocks fit neatly with their own shackles and two are used on the boom.
Yup, you read that right...a Snark with Harken and Ronstan hardware on it.
We're not done. The original mast deck used a small cleat for the main halyard. The original cleat is perfectly functional but here I am drawing inspiration from my own large sailboat boat and stuff I've read about Snarks. In a capsize I want to ensure the mast stays attached to the boat even if the halyard is undone. A conventional cleat doesn't allow this. I want something different.
My Catalina 27 is rigged for singlehanding. That means all of my lines, both halyards and sheets, are run to the cockpit. With the exception of the boom vang, which requires me to lean into the companionway to access, I can raise or lower the sails from the safety of the cockpit. To achieve this, my halyards descend the mast and go through turning blocks that redirect them along the deck and back to the cockpit and dedicated winches.
I like this setup. So I will repeat it here. Minus the winches, of course.
I use another Harken eyestrap and bolt it through the mast deck. With that in place I mount a third Ronstan swivel block to serve as a 90 degree turning block. This redirects the halyard parallel to the mast deck. To cleat it off when the sail is up or down, I use a Ronstan V-cleat with fairlead instead of a conventional cleat. This allows me to put a stopper knot in the halyard and that prevents the halyard from going through the cleat and stops the mast from parting from the boat.
Lastly, I attach the original Snark capacity plate/sticker from the original mast deck to the new one. This goes on with 3M spray adhesive. It went kind of bubbly but you don't notice from a distance.
Here's the new mast deck rigging:


For the lines, I bought new 3/16" Sta-Set polyester line. Each is 20 feet in length, one for the main halyard and one for the mainsheet. For the working ends, I tied in a small bowline. Through this I ran a 3/16" stainless anchor shackle. The main halyard with shackle attaches to the eye strap on the gaff to allow me to raise and lower the sail. The mainsheet shackle is attached to the top of the tiller, run through the bowline on the mainsheet and the line through the blocks on the boom. A stopper knot on the end of the mainsheet prevents it from being pulled back through the blocks.
Here's the mainsheet rigged and ready to go:


And the main halyard. Note the 3/16" shackle on the top of the gaff:


With these lines attached, we also complete the rigging of the Snark. Without further adieu, may I present Mini-Heeler in her fully restored glory:


I think she turned out quite nicely. The original sail is still a little dirty but what do you expect from free?
Transport and First Sail
With the Snark assembled, there is the natural eagerness to take her out and see how she does on the water. For this, I began fitting the boat for sea and transport to and from. One thing I decided to rig was a means of dragging and carrying the boat. For this, I added an eye screw to the inside transom and loop a double length of polypropylene line to a snap shackle that attaches to the bow eye. On that I tied a large bowline as a drag loop. This allows me to lift the boat using this bridle line or grab the loop to drag the boat across soft surfaces. Works great on grass.
It was during this process I also began to thing of how I was going to arrange storage and equipment in the boat. Since she is an open dinghy, the potential for important things like safety equipment to float away or sink becomes a concern. One of my core ideas for this boat is "all the important stuff stays attached". This concept allows for some neat simple solutions.
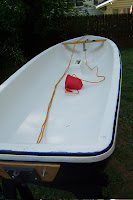
One of these is illustrated below in the form of an attached bailer. The bailer is a $2 paint container from Home Depot with a 5/16 inch drilled in the handle. I run a line through it and tie off a stopper knot. On the other end we tie a bowline and attach another 3/16" stainless anchor shackle. To keep the bailer attached, we loop the shackle end around the mast step and close the shackle on the line. The line is long enough to reach the center of the hull and allow the bailer to be retrieved in the event of going overboard or capsize.
Here's the hull derigged for transport with the bridle line attached but with the bailer in place to demonstrate:


The mast step proves to be the central aspect of keeping stuff attached to the boat. In addition to the bailer, I carry a small boat distress kit, a dry sack for my wallet and phone and mesh bag for telescoping paddle, hand compass, water, towel, spare hardware and to store anything else I might need. All of this gets secured around the mast step so it will stay with the boat if she goes over.
With the boat broken down, she gets tied to the roof of my Jeep and off I go to my marina. Four ratchet straps hold the boat securely in place and the spars are bungeed to the roof rack and mast step up underneath. Once at my marina, I reverse the process and carry the new boat to the boat ramp for launching.
Alas, nature intervened. With winds blowing around 10 knots, this was perfect sailing weather despite the heat. However Mr. Murphy decided that the moment I had the boat in the water and was rowing away was the perfect time to have a thunderstorm pass through.
So I found myself holding onto a pier until I was told it would take an hour or so to pass through. So I rowed the Snark to my Catalina and found that it would indeed snuggle nicely against her bigger sister in my slip. I tied her off and climbed aboard my big boat to wait out the storm.
After it passed, I bailed out the boat with her new bailer and went back into the creek to find sunny skies and no wind. So I paddled around the center of the creek, feeling out a sandbar with the paddle and got just enough of a breeze to let me sail, if such a word can be applied, slowly back to the boat ramp.
Here she is after her first successful "sail":


She floats and she looks good doing it!
Final Thoughts
This has been a hugely rewarding project. While I prove the adage that there is no such thing as a free boat, my costs have been reasonable. I did notice some things after my first trip that need resolving. The most notable postscript is the nylon sail really is on its last legs. In the photos above, the lighter diagonal across the sail is actually threadbare nylon and it tore during the first trip out. I can patch it with sail repair tape but a new sail is really in order.
So I ordered a new dacron sail. Now she truly is a new boat. The rest is just some additional fitting and adjustment for the daggerboard in its trunk.
The Snark is not done. I am working on a splash deck forward to give me a little drier space underneath and provide some wave protection. I am also debating cutting some wood and adding a toe rail of sorts to the top of the gunwhales from the mast deck to the transom. This would serve two purposes: to provide some wear protection during transport and give me a place to mount additional sail hardware. I think some cleats added to such a rail would allow me to cleat off the mainsheet instead of having to hold it and likewise do the same for the tiller and let the boat self-steer under sail. I'm thinking some cam cleats would be perfect. Other additions might be a cross beam to allow me to rig a traveller and/or boom vang and a means to hold a raised daggerboard in place. Lots to think about.
It doesn't end here. More posts will come on my trials and experiences with the Snark. I hope you've enjoyed it and learned something. I would welcome any comments and suggestions on how to improve the boat.
Fair winds!


